The starting point of any game project is writing a game loop. This is one of the most integral and crucial part of any game, whether small or large. So it must be given due attention and one should choose the most appropriate and optimized way of doing it.
The Android game programming is no exception and there are several ways of managing and writing this game loop. Here I’ll discuss some approaches that I found in SDK samples and other resources (excluding OpenGL part). There are some basic steps to follow before writing these game loops.
The first step is to create your own View or Layout by extending an existing Layout or View (like LinearLayout or SurfaceView). Then override its onDraw method to control the rendering over this surface. The general concept is, that you call some update function that calculates the dynamics of the new frame and then post an invalidate command that ultimately forces the View to draw itself, hence creating a simple basis for drawing and refreshing the objects on this surface.
1. Using TimerTask and Timer
One way of creating this loop is to extend the LinearLayout class and override its onDraw function. Then add a Timer object in the child class. Look at the code chunk below:

You then need to write some functions to start/stop this timer. They should look something like below:

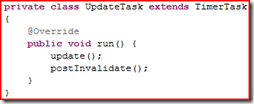
The schedule function of the timer object takes a TimerTask object and the time after which the Timer task is run. Here the UpdateTask is a custom class that extends the TimerTask and overrides its run function.

The postInvalidate function forces the View to redraw itself and the update function is a local function that you have to write yourself (you can name it anything) to calculate game’s next frame.
2. Creating a Custom Handler
This scheme is used in the Snake game that comes with the SDK’s samples. In this approach, you create a custom class by extending the Handler class and overriding its handleMessage function. The custom handle should be written inside you game view so that it can access the update and invalidate functions of your view. The child handler class should look like this:

Now you need to create an instance of this class in your game view class and then call its sleep function from your method that you will use to update your game’s frame. In the code snippet above, the sleep method calls some internal message handlers to make sure that the message is sent and handled appropriately. To find out more details about this approach, refer to the Snake game that comes with SDK samples.
3. Using SurfaceView, SurfaceHolder and a Custom Thread
This approach is considered more appropriate if one wants to write a game that is more real-time. Some SDK samples like LunarLander and JetBoy also implement this technique.
This method use the SurfaceView class to create its main game view class. The game view class in turn needs to handle the SurfaceHolder call back and then use it to get the underlying canvas which can be used to carryout the required drawing routines.
All the core game logic is written in the custom thread that uses it’s overridden ‘run’ method to update the game objects and redraw the view. This method contains a while(true) type of loop that repeatedly calls the drawing and updating routines. To draw the game objects, the method uses the SurfaceHolder’s lockCanvas method to get the underlying canvas object and then uses that object to do the drawings.
This approach doesn’t use the view or layout’s onDraw method and hence doesn’t require calling the invalidate method as the other two approaches do. Instead it clears the screen itself by calling the Canvas object’s drawBackground or drawColor routines.
Since there’s no delay or wait time mechanism in this approach, therefore, it allows the system to do the update and draw processing as fast as it possible increasing the refresh time of the game’s frames.
This wraps up the post here. I hope it is helpful for those seeking out to develop games on the Android platform.
![]() if you are developing an app having some cool and customized theme then doing something about those dull dialogs is a must. They wouldn’t just compliment the overall look of your application. I faced this kinda scenario recently and while experimenting and trying different suggestions on forums, I finally got around it and made it to work!
if you are developing an app having some cool and customized theme then doing something about those dull dialogs is a must. They wouldn’t just compliment the overall look of your application. I faced this kinda scenario recently and while experimenting and trying different suggestions on forums, I finally got around it and made it to work!


