Category: Applications


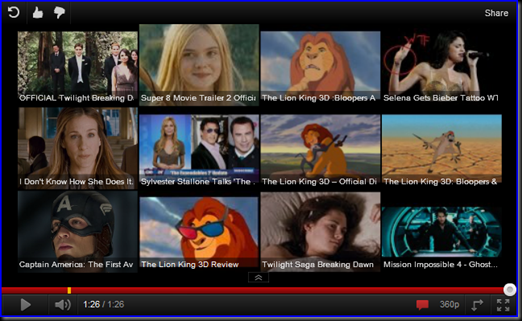
While watching some videos on youtube, I noticed a change! Yes, after Android Market following the Microsoft’s Metro UI, it’s now our favorite Youtube that’s following up on the tile based UI that MS introduced with their WP7 release. Now that we’ll going to see Metro UI in Windows 8 (Tablets and PCs) and in Xbox 360, I expect that others will follow the same trend soon.


image


Heads up to Microsoft for the introducing a simplistic, fast and neat UI for modern devices.

Text is one of the most important part of any application or game regardless of the platform it is running on. Without good fonts your overall design doesn’t finish up looking neat.

I was recently making and designing a small fun app for Android (find it here) and I opted to use paper/pencil sort of design for it. I happily designed some backgrounds with paper textures (in GIMP) but eventually I faced a bad situation since Android doesn’t have a font (natively available) that gives a sketchy/handwriting type of look to the text. Without the fonts I liked the app to have, the overall feel of the application would be ruined. I was using libgdx for the main part but one of the screens was build with Android views and layouts. Libgdx does support custom fonts and integrating it was smooth. The problem aroused when I tried to use the same font for the views I was using in the other activity. After a lot of experimenting and surfing on the internet, I got it to work!

So, here’s what you need to do in order to use custom fonts in your apps. Before beginning, let me make this clear that font files are incorporated in your app’s apk. This means that the more larger the font file (.ttf) is the larger your apk will become.

  • First step – Choose a font! Remember, the font should not be large enough that results in drastically increasing the apk size.
  • Then, you need to copy its TTF file into the assets folder of your app/game. You can directly put it into this folder or you can also keep a separate folder inside the assets for fonts.
  • Declare a Typeface instance either globally or inside the function in which you’ll assign this to your controls.
  • Next, initialize this variable by calling Typeface.createFromAsset function like below:

image

  • I made a fonts folder inside the assets folder and the same was specified in the function argument. I found people using and suggesting createFromFile function instead of createFromAsset but that simply didn’t work out for me. So this is what I will recommend to my readers.
  • Now that you have the Typeface initialized, you can simply assign it to any view that has something to do with fonts or text (EditText, TextView etc). You need to use setTypeface function of the view in order to assign the typeface to that view.

And that’s it! Do get back to me with your queries or if you have other method of achieving this objective in Android apps/games.

Native dialogs in Android are boring! Open-mouthed smile if you are developing an app having some cool and customized theme then doing something about those dull dialogs is a must. They wouldn’t just compliment the overall look of your application. I faced this kinda scenario recently and while experimenting and trying different suggestions on forums, I finally got around it and made it to work!

First things first, as far as my experience went, AlertDialog is not going to help you here. It just don’t get rid of that black background that is there by default (talking about gingerbread dialogs here). No matter what you do, it’ll always show the black background from behind your image (if you have any). Anyways, to create a custom dialog, we need to create a layout first in a separate xml file. Here’s an example:

Capture

This is just a simple layout having a background image that has irregular borders. Now we just need to write a few lines of code in order to make it work:

Capture

Here, we are setting the background color to transparent in order to get rid of the default dialog background color. After that, we just need to assign the layout resource to the dialog and that gets the job done.

Notice the resultDlg.getWindow().clearFlags(WindowManager.LayoutParams.FLAG_DIM_BEHIND); This will remove the dim effect that makes your parent layout a bit darker. You can also set some additional flags like adding a blurred effect to the background/host activity from which this dialog is invoked. To do this, simply use the addFlags function with FLAG_BLUR_BEHIND flag. Here’s the exact statement:

resultDlg.getWindow().addFlags(WindowManager.LayoutParams.FLAG_BLUR_BEHIND);

This will create a very nice blur effect which I find more neat than the original dim effect. And that ends this post here. Feel free to comment and ask questions, I’ll try to answer them as swiftly as I can.

Quite a long title, isn’t it? Smile

On-screen keyboard usually takes around half of the screen space while it’s shown. Most of the times it hides important controls/views that you want to be shown to the user all the times. Consider a layout having a EditText widget at the top, a list or some other control in the middle and some Buttons right at the bottom. While the user is writing text in the EditText view through on-screen keyboard, the buttons would be hiding behind it. Luckily, Android has an option to handle this scenario automatically without writing much code.

To enable a layout to adjust itself while the keyboard is shown, you need to configure an attribute for its host activity through AndroidManifest.xml file. Here’s how to do it:

<activity android:name="TestActivity" android:windowSoftInputMode="adjustResize" android:screenOrientation="portrait">

By setting android:windowSoftinputMode of this activity to adjustResize you are telling it to resize itself while the on-screen keyboard is shown. This will let the activity to shorten it’s layout in order to show everything that’s present over it. For example, if you have some buttons at the bottom of the screen, this setting will show them just above the keyboard helping the user to interact with them without closing the keyboard.

There’s one important catch in this however, this configuration DOES NOT work if the application is bound to run in full-screen. This is normally done by setting it’s android:theme attribute to @android:style/Theme.NoTitleBar.FullScreen in AndroidManifest.xml file.

This is one simple and neat technique to make your layout more flexible and user-friendly.

The soccer edition of Sports Eye has been reviewed recently by Paul Wilks on AndroidTapp.com. Here’s some extract from his review:

Sports Eye – Soccer is a sports news aggregator that specialises on soccer (football in the UK). Users can specify sources, choosing to select players of interest, blogs and news sources. There is also fixture lists, past scores and league tables. The app itself is nicely developed and navigation is effortless and relatively fast.”

Hit the link after the break to read the full review:

http://www.androidtapp.com/sports-eye-soccer/

The review overall has been encouraging and we’ll start improving the application to overcome the shortcomings that were mentioned. The next release will include:

  • More News, Blogs, Scores, Schedules and Ranking Sources
  • More Players
  • In-app viewer instead of opening the browser
  • Users shall be able to suggest a news, blog and other sources (as well as players). They’ll be incorporated inside the app in the form of subsequent minor releases.

Recently, we at excelarz Interactive made a series of Sports Apps that enables user to follow their choice of sports in an intuitive and flexible manner. The set of applications offers its user to view news, live scores, blogs, players, schedule, draws, twitter feeds according to his choice. What we needed was to build the apps in a way as to enhance the usabilty by letting the user customize the application in a way that he choses.

For implementing the switching between selected information types (news, blogs, scores, players, twitter, schedule etc), we first looked into the native tab control of Android. After digging enough, we concluded that the tab control would not help us accomplish this variable nature that we required from it due to its rigid set of options and properties.

We then came up with the idea of using the Gallery view for achieving this functionality. What we do is we make some images for each of the tab that we require to have in our application. Then a simple adapter is created (which is required to populate the gallery dynamically) and pass on the list of selected tabs to the adapter. The adapter then creates the view as per the selection made by the user. This way we managed to acheive a sliding choice bar for selection of different info type.

See the tab bar in action the the following video.

This approach may definity not the ideal one in this scenario but we did achieve what we wanted to do. Any suggestion on improvements and alternative is more than welcome.

Early this morning while i was going through the download stats of my apps, I noticed a new ‘Statistics’ link against each application info. This is shown in the screenshot below:

Upon clicking the link, you are presented with pretty useful information in graphical format. The information include Accumulated installs trend, OS breakup, Device breakup,  Country and Language statistics in the form of pie-chart. The stats shows both the overall market statistics as well as those specific to your application.

This new feature seems quite useful in a sense that you can now find out your niche in terms of countries and devices. Also you can find out and improve your application based on the version of Android it is being used mostly.


Recently, I had to implement Twitter sharing in my new app that I have been working on recently. Upon searching about how to do this, I found out a library called Twitter4J. This library has some decent functions but it’s not that simple to implement as compared to the Facebook SDK which handles all the stuff within and exposes some handlers for post-authentication tasks.

Anyhow, I continued my research about using this library and found out some implementations that launch the browser for authentication and then invoking your application back when the process is complete. From there onwards, things become simple.

I however didn’t like the idea and rolled over my sleeves to code what I had in my mind. Instead of loading the browser, all I did was put a webview in my activity to load the authentication url in it. Upon completing authentication, it is redirected to the callback url that is specified while initializing the twitter object. Checkout the code below:

 Capture

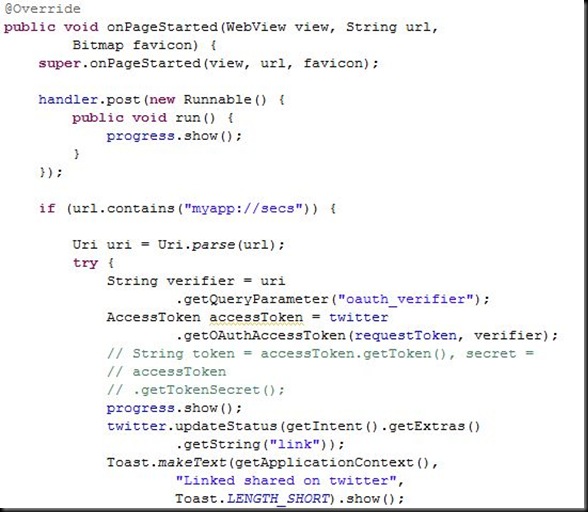
You can specify any custom URL in place of CALLBACKURL (which is defined as a constant in my class). After this, all you have to do is to place a check in your WebViewClient’s onPageStarted method to find out if the authentication is done and the twitter has redirect you back to your callback URL.

Capture

Almost done! Smile Now you can use the updateStatus function to update the status on Twitter.

eXcelarz Interactive just released another App in the Android Market. Made exclusively for cricket enthusiasts, this app features cricket news, live scores, blogs, player tweets, match schedules and various sharing options. Checkout the video walkthrough after the break.


Sports Eye Cricket Special–Feature Walkthrough

Source: Random Ramblings

The first post of the year 2011 comes with the arrival of the first Grand Slams of the year. And this time I won’t be speculating about whome’s going to add the title to their name but reviewing an Android app focusing on Tennis Grand Slams title ‘Sports Eye Tennis Special.

The Sports Eye Tennis Special comes with loads of bundled feature for a true Tennis fan. It has the ability to gather News from various news sources related to tennis such as Australian Open, ATP, WTA, BBC, CNN, ESPN and allows me to select the source from which I want to keep up with. Same option goes for following Tennis Blogs and remaining in touch with what the experts’ opinions are. But what I loved about the app is their option to view the Player activities by getting their updates from Twitter and Facebook accounts (and yes, Federer is in the list of players:) )! The Players list consists of top 20 ATP and WTA tennis players and being up to date with their activities on and off the court in Melbourne is truly awesome!!! Tweets from official tennis sources such as Australian Open, ATP, WTA, Tennis Channel are available and in that too you have the option to select the source from which to remain updated.

And any AO app won’t be complete without Live Scores so Tennis Special also has the facility to show live scores, draws and schedule of play! And if filtering down sources wasn’t enough, the app also gives me the power to turn off the whole feature so that I don’t get distracted by extra information. From this I mean that if I don’t want to view news, I can de-select it from settings and viola the news tab won’t show in the main screen. Also, I like the fact that all information is available in one view and with a single tap I can browse through different categories of News, Blogs, Players, Scores etc. A widget for home screen is also available.

It has the option of Background Sync of information when you get connected to the internet, notification about new information and offline viewing of the news so that you don’t need to be on the net all the time just to read updates.

With the AO starting in just two days time, Tennis Special is going to be my source of information about the happenings in Melbourne and especially in Rod Laver Arena. And if you have an Android phone, do download the app from the Market and watch AO right from your cell.