
It’s been a while since that leaked 4.3 rom for Nexus 4 is out in the wild. There are many guides out there which takes you through the steps for installing the rom on your device. I personally followed this guide to install it on mine. Since the download link mentioned in this post seems very slow, I resorted to Google to find if any other mirror is available to serve the rom. I strongly suggest downloading from this link instead, it’s fast and doesn’t seem to be overloaded with requests as of now. Also I followed this guide to boot into TWRP recovery instead of flashing it and replacing the stock recovery. Remember that this won’t flash your data but you should use the backup options available in recovery before flashing the rom.
Latest Entries »
Yes, that’s true. You can boot into any recovery of your choice on your Android phone by following this guide. No need to flash and replace the stock bootloader. Though I have tested this method on Nexus devices only but I am pretty sure that it’ll work on other phones as well. Custom recoveries give you a lot of options for performing some important tasks, like backup and restore your phone and wiping out caches.
Prerequisites
- An unlocked bootloader – It is just a command away on Nexus devices. Google will give you very useful links depending on your device type.
- ADB with Fastboot – Check out this link: http://www.jailbreakeye.com/android/install-adb-fastboot
- A custom recovery image – TWRP or CWM (check the Download recovery or Download touch recovery columns)
Guide
- Copy the downloaded recovery image (.img file) to the folder where you have placed your ADB and Fastboot.
- Launch terminal (or command prompt on Windows).
- Navigate to the directory where you have placed the ADB, Fastboot and .img file together.
- Shut down your phone and reboot into boot loader. For nexus devices, simply hold volume down + power to start up the phone.
- Connect your phone to your computer.
- On terminal (or command prompt) window, write fastboot boot <img file name>, e.g. fastboot boot twrp.img.
- Your phone will restart and will boot into the recovery mode.
That’s it. As simple as it can get!
Background
Recently, while working on a project, I stumbled upon a requirement to implement some sort a notification or alert mechanism in a web application. Due to the criticality of performance factors, the final solution would have to be implemented in such a way that it must not consume much server/client resources itself. Without having another thought I decided to try and implement a push based notification mechanism that can send messages to all the connected client as and when required.
What is SignalR?
SignalR is a library from Microsoft that can be easily integrated into any ASP.NET application targeting .NET Framework 3.5+. The library provides easy to integrate interfaces for implementing a push-based notification server and its consumers. The library exposes both high-level and low-level APIs which makes it flexible enough to be used in different kinds of scenarios. You can communicate with a SignalR server through JQuery, .NET based console applications, windows services, desktop applications & WPF applications. This library makes it vert easy to implement any real-time functionality in a web application that needs to send messages to connected clients without implementing any sort of polling mechanism. For communication, the library uses WebSockets wherever available and falls back to other standard communication techniques if it finds that WebSockets aren’t supported. For further details about the library, go to this link.
Implementing the Notification Server
You can easily create a notification server by using Hubs which is a way to implement a listener class in your web application. The Hub class hides all the low level connection management detail and exposes useful, high-level properties and functions to make your life easier. I’ll be creating an MVC 4 application but it should work with MVC 3 as well.
Open the Visual Studio (I am using 2012 express edition for Web) and create a new MVC 4 project. On the project template dialog, select Basic. After the project is created, right click on References (in Solution Explorer) and select ‘Manage NuGet Pacakges’. In package manager window select online from left and search SignalR. Refer to the image below:

You’ll have to install Microsoft ASP.NET SignalR into your project as shown. The package manager will install all the related dependencies as well.
Now, create a new folder in your MVC application and name it Hubs and create a new class in that folder. You can name the class any way you like but it should inherit from Hub class. I am naming it NotificationHub. The full implementation of the class is as seen below:

Here, I have created one method for registering a client on its request. I am doing it this way so that server knows where to send a message in response. The class is also maintaining a collection of all the connected clients for use later on. I have also added an AddNotification method taking message and username as parameters so that the server knows which user to send message to. The AddNotification method can be called from any other client which needs to notify the web application’s clients about some event.
Also take a note of this statement – Clients.Caller.addMessage(“‘” + userName + “‘ registered.”). The Caller property is dynamic type and the addMessage is actually a client method that the server is trying to call through SignalR interfaces. The method will be implemented in the web client through JQuery in next section.
Implementing a JQuery/JS Client
In your MVC application, add a new controller. The controller just needs to implement a single action method for this demo. Here I have created an Index action that is not doing anything but just calling its view.
Now add a view for the action that you have just created. Add the following code in your view.
@{
ViewBag.Title = “Index”;
}
<script src=”@Url.Content(“~/signalr/hubs”)” type=”text/javascript”></script>
<!– Following scripts are created dynamically at runt –>
<script src=”~/signalr/hubs” type=”text/javascript”></script>
<script type=”text/javascript”>
$(function () {
$(“#sendControls”).hide(“fast”);
// Proxy created on the fly
var notificationHub = $.connection.notificationHub;
// Declare a function on the hub so the server can invoke it
notificationHub.client.addMessage = function (message) {
$(‘#messages’).append(“<li>” + message + “</li>”);
};
// Start the connection
$.connection.hub.start().done(function () {
$(“#register”).click(function () {
// Register client.
notificationHub.server.registerClient($(“#user”).val());
$(“#registration”).hide(“fast”);
$(“#sendControls”).show(“fast”);
});
$(“#send”).click(function () {
// Call the method on the server
notificationHub.server.addNotification($(“#msg”).val(), $(“#toUsr”).val());
});
});
});
</script>
<div>
<div id=”registration”>
<label>Username: </label>
<input type=”text” id=”user” />
<input type=”button” id=”register” value=”Register” /><br />
</div>
<div id=”sendControls”>
<label>To (Username): </label>
<input type=”text” id=”toUsr” /><br />
<label>Message (Username): </label>
<input type=”text” id=”msg” />
<input type=”button” id=”send” value=”Send” />
</div>
<ul id=”messages”>
</ul>
</div>
Some of the scripts that provide communication interfaces are generated dynamically. See the following script include:
<script src=”~/signalr/hubs” type=”text/javascript”></script>
You’ll also have to include the signalR js file (jquery.signalR-1.1.0.min.js) in order for the client to work properly.
The client creation steps are straight forward. First, you have to get the instance of the server hub which is done through the following statement:
var notificationHub = $.connection.notificationHub;
This line actually creates a Hub Proxy (see SignalR documentation to find out more about it). Since I named my server hub class as NotificationHub, the above statement uses $.connection.notificationHub. If your class name is Abc then you should use $.connection.abc (notice the change in first letter case of class name). After getting the instance of proxy, you’ll have to register all the client methods that you want your server to interact with. Here I have added only one method called addMessage. After that, you’ll need to start the hub connection. SignalR also exposes a done event which helps in registering a callback when the client has successfully established the connection to server. In that event, I have written a statement which is calling the server’s RegisterClient method. Notice how the case of the functions has changed to ‘registerClient’ instead of ‘RegisterClient’.
Here you go, you have written a client that can now interact with server by calling a method in the hub class. Also the server is able to call the client’s JS method whenever it wants.
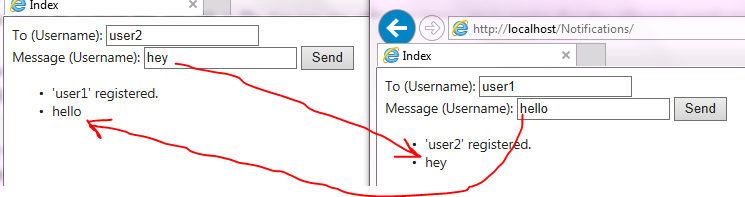
To test the output, run the application. Enter a user name to register and click register. Open your application link in another browser window, type another username and click register. Now you can communicate between the two client application using the provided input controls. Each client window calls the Hub’s method at server and that method in return pushes some message to another client window by calling a JavaScript function at the client side. See the screenshot below.
Implementing a .Net Client
The .NET client application is similar to what we have done in the JQuery/JS client. I have created the following helper class that can easily be integrated to any .NET based client that needs to call a SignalR based Hub.
class NotificationClient
{
HubConnection _connection;
IHubProxy _proxy;
public bool IsConnectionOpen { get; set; }
public NotificationClient(string url, string hubName)
{
_connection = new HubConnection(url);
_proxy = _connection.CreateHubProxy(hubName);
}
public void AddClientMethod(string methodName, Action method)
{
if (IsConnectionOpen)
throw new InvalidOperationException(“Client methods cannot be added after a hub connection has been opened.”);
_proxy.On(methodName, method);
}
public void AddClientMethod<T1>(string methodName, Action<T1> method)
{
if (IsConnectionOpen)
throw new InvalidOperationException(“Client methods cannot be added after a hub connection has been opened.”);
_proxy.On(methodName, method);
}
public void AddClientMethod<T1, T2>(string methodName, Action<T1, T2> method)
{
if (IsConnectionOpen)
throw new InvalidOperationException(“Client methods cannot be added after a hub connection has been opened.”);
_proxy.On(methodName, method);
}
public void AddClientMethod<T1, T2, T3>(string methodName, Action<T1, T2, T3> method)
{
if (IsConnectionOpen)
throw new InvalidOperationException(“Client methods cannot be added after a hub connection has been opened.”);
_proxy.On(methodName, method);
}
public void AddClientMethod<T1, T2, T3, T4>(string methodName, Action<T1, T2, T3, T4> method)
{
if (IsConnectionOpen)
throw new InvalidOperationException(“Client methods cannot be added after a hub connection has been opened.”);
_proxy.On(methodName, method);
}
public void AddClientMethod<T1, T2, T3, T4, T5>(string methodName, Action<T1, T2, T3, T4, T5> method)
{
if (IsConnectionOpen)
throw new InvalidOperationException(“Client methods cannot be added after a hub connection has been opened.”);
_proxy.On(methodName, method);
}
public void AddClientMethod<T1, T2, T3, T4, T5, T6>(string methodName, Action<T1, T2, T3, T4, T5, T6> method)
{
if (IsConnectionOpen)
throw new InvalidOperationException(“Client methods cannot be added after a hub connection has been opened.”);
_proxy.On(methodName, method);
}
public void AddClientMethod<T1, T2, T3, T4, T5, T6, T7>(string methodName, Action<T1, T2, T3, T4, T5, T6, T7> method)
{
if (IsConnectionOpen)
throw new InvalidOperationException(“Client methods cannot be added after a hub connection has been opened.”);
_proxy.On(methodName, method);
}
public void CallServerMethod(string methodName, params object[] parameters)
{
if (!IsConnectionOpen)
throw new InvalidOperationException(“Hub connection must be opened before calling a server method.”);
_proxy.Invoke(methodName, parameters);
}
public T CallServerMethod<T>(string methodName, params object[] parameters)
{
if (!IsConnectionOpen)
throw new InvalidOperationException(“Hub connection must be opened before calling a server method.”);
return _proxy.Invoke<T>(methodName, parameters).Result;
}
public void OpenConnection()
{
_connection.Start().Wait();
IsConnectionOpen = true;
}
}
It is very easy to use the class in order to communicate with the SignalR Hub. See the following code:
NotificationClient client = new NotificationClient(“http://localhost/Notifications”, “NotificationHub”);
client.CallServerMethod(“AddNotification”, “Message”, “username”);
As you can see, implementing a real-time RPC calls from server-to-client and client-to-server becomes very much easier using SignalR library. The library is getting mature and current release is very much stable and provides enough funtionality for these type of scenarios.
Background
Last week, while working on my MBP (mid-2010, 15 inch, OS X 10.8.3) I found out that Apple has updated Boot Camp to support windows 8 officially. I already had Windows 8 (Upgrade version) installed on my machine through older version of Boot Camp and it was working fine with Windows 7 drivers. I installed it through bootcamp by installing Vista through DVD and then running Windows 8 setup from there.
Anyhow, I gleefully downloaded the new bootcamp support software to a USB drive, booted up Windows 8 and tried to run the setup. To my disappointment, I got an error message indicating that the setup can’t be run. Annoyed, I researched a bit to found out that the new drivers (downloaded through bootcamp) only support the 64-bit version of Windows 7 and 8. And I had 32-bit version! So it turned out, the Windows Upgrade Assistant checks your host system for the architecture (64 or x86) and then downloads the appropriate ISO accordingly. Doing further research almost drowned my hopes as there were numerous posts suggesting that migrating to 64bit version isn’t viable and in order to do so, one has to get the installation DVD from microsoft or any other supplier and that the upgrade version can’t do this. After reading some comments pointing to the actual solution, I decided to give it a go and today I successfully managed to install Windows 8 x64 on my MBP using bootcamp, and that too from scratch (after formatting my existing bootcamp partition).
The Process
- Grab a machine running the eligible-to-upgrade 64-bit version of Windows (I used a 64 bit Windows 7 VM for that purpose). You’ll use this machine to run the upgrade assistant and to download the ISO.
- Search for the email that you must have received after purchasing the upgrade (through the Upgrade Assistant).
- Look for this phrase: This is your receipt – make sure that you print or save a copy for your records. If you need to download Windows, write down your new product key and enter it here.
- Click on the link to download the upgrade assistant. Make sure to use the 64-bit Windows machine to do this.
- Run the upgrade assistant and follow the steps to download the ISO, there are various tutorials and walkthrough over the internet so I am skipping this part.
- After the ISO has been downloaded, you’ll have to burn it either on a usb or on a DVD. I used a DVD since my MBP doesn’t support installing Windows through bootable USB.
- Download Windows 7 USB/DVD Download Tool. And use this to burn it on your preferred medium (USB or DVD). Here you go, you have the 64-bit Windows 8 installation medium now.
- If you want to install it on a Mac then use Boot Camp to create a new partition and then install the OS normally.
- If you own a PC, use this DVD/USB to boot up the system and upgrade/clean install your existing version of Windows.
Now here’s the important part. You CAN install Windows 8 on a formatted partition through this installation USB/DVD. I had NO problems in doing so and I DID try this method on BOTH PC and Mac. The upgrade version DOES NOT check for existing installation unlike a common misconception you’ll find throughout the internet. Both of my Windows 8 x64 installations are shown as fully activated and behaving normally. Some people do report that they encountered some issues while activating their windows after using the Upgrade version to fresh-install their OS. You can go to this link if you face that problem.
Here it is. Share your experience of upgrading to 64-bit or any other installation tweaks or guides that are helpful for others in need 🙂
I’ll be uploading all my sketching/artistic stuff only on Tumblr from now onwards. Here’s the link: http://aubykhan.tumblr.com. See you there! ![]()
My first ever take on a fighter plane. F-16 is a real beauty and my personal favorite. Had to research a bit before creating this scene. Done in GIMP using pencil, brush, spray paint and smudge tools. Took around 90 mins to finish this off.


Another one using tablet and GIMP. Took around 90 mins. Again a half baked idea but I think I am loving the tablet experience :D.

Finally got my hands on a tablet! And here’s the first one using that (BAMBOO PEN CTL 460). Again used GIMP, took around 1 hour to complete.

Here’s another one which I just wrapped up. Took almost 90 mins to make. No straight lines and curves. Used brush, smudging and a bit of spray paint tool. No tablets yet so all mouse work once again. Done in GIMP. I didn’t have clear idea how it would look like in the end, just started with a very vague one and ended up like this. There are no leaves on trees which indicates my lack of finishing touches with trees right now so I didn’t draw them at all.

